")
The siege of the port of Tobruk in Libya (April to Dec 1941) by Axis forces during the Second World War (1939-45) lasted 242 days and became a symbol of Allied resistance. Besieged by land but still supplied by sea, Tobruk was of vital strategic significance to both sides in the Western Desert Campaigns. Two attempted breakouts failed to lift the siege, but neither could the Axis troops led by General Erwin Rommel (1891-1944) break the defenders' resistance. It was not until a third Allied offensive, code-named Crusader, that Rommel was finally obliged to withdraw.
The Battle for North Africa
Into the second year of WWII, the Allies, then principally British and Commonwealth forces, were particularly keen to protect the Suez Canal from falling into the control of the Axis powers of Germany and Italy. The loss of the canal would effectively cut the British Empire in half. North Africa was also strategically important to both sides' wish to control and protect vital Mediterranean shipping routes. The island of Malta was also crucial in this role and holding the island fortress (then in British hands) was another reason to control potential airfields in the North African desert. Finally, North Africa was the only place where Britain could fight a land war against Germany and Italy and so hopefully gain much-needed victories that would encourage the British people after the debacle of the Dunkirk Evacuation and the horrors of the London Blitz. For all of the above reasons, a series of desert battles ensued, which are collectively known as the Western Desert Campaigns (June 1940 to January 1943).
At first, the British Army, with Operation Compass, won a series of victories against poorly equipped Italian forces, and Tobruk was captured in January 1941. From February, the Axis presence in North Africa was considerably boosted by the arrival of German troops such as the elite Deutsche Afrika Korps (DAK) with superior armour, weapons, and training compared to both the Italians and the Allies. Things improved further for the Axis powers when General Rommel took over command of Axis forces in North Africa. Rommel's official orders were to contain the Allies and focus primarily on defence; these he blithely ignored and immediately went on the offensive. Rommel, besides capturing two British generals, gained El Agheila in March 1941, then Mersa Brega on 1 April, Benghazi on 4 April, and El Mechili on 7 April as he moved in on the port of Tobruk in Cyrenaica (modern-day Libya), vital if he was to protect his left flank when he conducted his planned invasion of Egypt to take the Suez Canal.
Rommel's two persistent problems were insufficient manpower and a lack of supplies (especially food, fuel, and ammunition), but his opponents were beset with similar logistical challenges and, in addition, were severely hampered by poorly-trained troops, poor equipment, poor multi-arms cooperation, and poor commanders who could not cope with Rommel's tactics of using his armour with speed and audacity. Rommel's tactics more than compensated for his numerical inferiority in men and tanks compared to the Allies.

Mastering logistics remained the key to success in the desert war, though, and whoever controlled the port of Tobruk had a distinct advantage over the enemy. The commander of the Allied Middle East Forces, General Archibald Wavell (1883-1950), was ordered to hold the port at all costs. With the war going badly for the Allies everywhere else, British Prime Minister Winston Churchill (1874-1965) was particularly anxious that North Africa did not contribute to the already sorry catalogue of defeats. The Allies did have the advantage that although Rommel's armour was closing a ring around Tobruk on land, the port could still be supplied by sea thanks to the Royal Navy's presence in the Mediterranean. A disadvantage was that Wavell was obliged to send some of his force to participate in the ongoing campaign in Greece.
Tobruk's Defences
Tobruk was crucial to any army wishing to advance into Egypt. It was "the only safe and accessible port in over 1,000 miles" (Liddell Hart, 109). Before the war, it had been a small town with no more than 4,000 residents. The Italians, as Cyrenaica was then one of their colonies, had built it up as a naval base and strongpoint. Not only could Tobruk be used to ship in men and supplies but its possession also posed a threat to the enemy since it could be used as a base to launch major offensives. Whoever controlled Tobruk also controlled this part of North Africa.
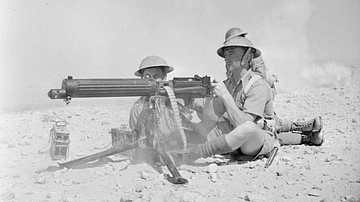
Tobruk's defences included an extensive network of bunkers and trenches built by the Italians, which were now greatly extended and improved. Beyond these fixed defences were massive anti-tank ditches (on average 7 ft / 2.1 m deep and 10 ft / 3 m across), minefields, and deep stretches of barbed wire. The defences were several miles deep and created a safe perimeter of around 34 to 40 miles (56 to 64 km) in length. The outer ring of defences was composed of well-camouflaged concrete dugouts, often using natural caves. These strongpoints, connected by trenches, could protect a group of up to 40 men each. Dotted between the strongpoints were pits with machine-gun posts, mortars, and artillery. The new defenders not only used the Italian static defences but also used captured Italian 75mm and 102mm artillery pieces.
The Allies had a sizeable garrison of 33,000 troops at Tobruk, including two brigades of the Australian 9th Division commanded by Major-General Leslie Morshead (1889-1952), affectionately known to his troops as 'Ming the Merciless'. There were also five artillery regiments (later boosted to seven). Additional artillery was provided by the Royal Navy vessels in the port.

Resisting the Onslaught
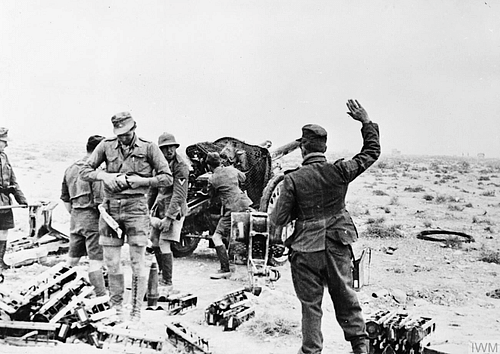
In the second week of April, Rommel surrounded the port and attacked Tobruk immediately, but his army, having just charged across North Africa, was in desperate need of rest and resupply. It was not until 30 April that Rommel was ready to make his first large-scale attack. A heavy artillery bombardment accompanied regular aerial bombardments using a force of Junkers Ju 87 'Stuka' dive bombers. These bombing raids had limited success, a British report of late 1941 remarked, "dive bombing on average does practically no damage" (Mithchelhill-Green, 197).
The Axis artillery, on the other hand, had every part of Tobruk in its range, including the vital harbour which received supplies by night from a fleet of Allied shipping that ranged from local sponge-fishing boats to naval destroyers. This motley fleet managed, through the duration of the siege, to land at Tobruk some 34,000 tons of stores, 92 artillery pieces, and 72 tanks. Neither the tank and infantry attacks from the land side nor attacks by Axis ships and submarines in the Mediterranean could break Tobruk's resistance, despite sinking 31 naval and merchant ships and badly damaging eight more over the course of the siege.
Rommel, only able to make a two-mile inroad into the outer defences, was impressed by the resistance, particularly by the Australians:
The Australians fought with remarkable tenacity. Even their wounded went on defending themselves with small-arms fire, and stayed in the fight to their last breath. They were immensely big and powerful men, who without question represented an elite formation of the British Empire, a fact that was also evident in battle.
(Liddell Hart, 112)
The North African campaign is often cited as a theatre of the war where chivalry was still present, but the reality was that little quarter was given. Three hospital ships were sunk by German dive bombers, and the two clearly marked hospitals in Tobruk were repeatedly targeted, too. On the other hand, there was some humanity in the decision by both sides not to fire upon the enemy for two hours beginning at dusk, the usual time when troops who had been baking in their trenches all day were resupplied with food and water. Although Tobruk received supplies by sea, the unreliability of ships getting through meant that food, water, and cigarettes were all strictly rationed, and the diet, largely limited to tinned food supplemented with Vitamin C tablets, became monotonous indeed. The poor diet had a long-term effect, as noted by the historian D. Mitchelhill-Green:
Sustained poor nutrition invariably led to the appearance of 'desert sores' - a loosely applied term for bacterial skin infections that took weeks to heal - as well as dysentery, a scourge on both sides. Not surprisingly, most of the besieged troops had lost 2st [12.7 kg] by the time they were evacuated.
(234)
Rommel was determined to break the resistance, and repeated attacks were made, but his panzers could only make sporadic gains. Bombardier Ray Ellis describes what became a familiar sight to Tobruk's defenders:
I could see the black crosses on the German tanks as they came thundering across the rocky terrain in a headlong assault with all their guns blazing. It was a terrifying sight, and as we put down fire among them we could see that the infantry were following close behind. I saw men moving, running in little bursts from one piece of cover to another, and I could hardly believe that I was actually standing there, under shellfire, watching the German infantry advancing towards me.
(Lyman, 142)

As the months went by, the featureless desert became dotted with burnt-out tanks and ditches filled with corpses. At the same time, Tobruk's harbour became littered with shipwrecks of all kinds. Commando-like raids were made by both sides, often at night and targeting a particular stronghold or enemy patrol. Snipers also worked on both sides, striking down anyone careless in the trench systems that were surprisingly close to each other in the western sector. The 'No-Man's Land' between the trenches became cluttered with lethal booby traps set by both sides. Tobruk itself was flattened, with only one major building left standing. The port was hit by 787 air attacks from April to June alone, which "meant that on average 73 enemy aircraft were in the air over Tobruk every day" (Lyman, 178).
The siege was now gaining international press attention. Churchill sent a signal to Morshead: "The whole Empire is watching your steadfast and spirited defence of this important outpost of Egypt with gratitude and admiration" (Dear, 870). The troops defending the port, particularly the Australians, became known as the "rats of Tobruk".
The Fightback
In an attempt to break the siege from the outside, Wavell launched the Brevity Offensive on 15 May. The British general managed to reclaim the frontier positions of Halfaya, Sollum, and Capuzzo before Rommel retook them at the end of May. Wavell was pressured by his superiors to make another push to relieve the pressure on Tobruk. Accordingly, with his force boosted by newly shipped-in tanks and fighter planes, the Battleaxe Offensive was launched on 15 June 1941. There was, too, air support from the Allied Desert Air Force based in Egypt. Once again Halfaya was attacked, but Rommel's use of powerful 88mm artillery as anti-tank weapons devastated the British tanks. Within three days, Rommel was pushing the enemy back into Egypt. In the encounter, Rommel had lost only 12 tanks compared to the enemy's 91. On 1 July, Wavell was replaced by General Claude Auchinleck (1884-1981).
Both sides spent the next five months consolidating their positions, the British in readiness for a third offensive and Rommel in strengthening his defences. Auchinleck was aware that his predecessor had been rushed into the Brevity and Battleaxe offensives, and he was determined to take the time to prepare for a third. Auchinleck even cabled Churchill demanding that he have a 50% reserve of tanks before attacking Rommel. Churchill replied, "Generals only enjoy such comforts in Heaven. And those who demand them do not always get there" (Dear, 994).
In the absence of a direct confrontation, both sides attempted to disrupt each other's supplies using their air forces. Here the Allies had the advantage and destroyed some 62% of all Axis supply convoys. Rommel's Afrika Korps, indeed even the general himself, were not suited to static warfare, and there remained the problems of logistics since all Rommel's supplies had to come by truck from Tripoli. Further, an increased naval presence by the Royal Navy in the southern Mediterranean and increased air attacks from bases in Malta conspired to further reduce Axis supplies. In July, 83% of the supplies destined for Rommel reached their destination, but this figure fell to 65% in August and just 37% in October. In November, an entire convoy of seven Axis ships was sunk. Not unrelated, the general lack of priority given to the campaign by Nazi Germany's leader Adolf Hitler (1889-1945) was a constant frustration for Rommel. Hitler was far more interested in what was happening in Greece and in building up his forces in readiness for Operation Barbarossa, the attack on the Soviet Union, which began in June 1941.

The Crusader Offensive
In August and September, the Australian troops at Tobruk were ordered by their government to withdraw, but they were replaced by British Army troops, which included the famed Black Watch and Durham Light Infantry. Empire troops included the 2nd South African Division, the 4th Indian Division, and a New Zealand Division. In addition, there was the Polish Carpathian Brigade and a Czech battalion. All of these troops came in through the port. The new commander of the cosmopolitan Tobruk garrison was Major-General R. M. Scobie.
Auchinleck, meanwhile, had been able to bulk up what was, from September 1941, called the British Eighth Army, commanded briefly by Lieutenant-General Alan Cunningham (1887-1983) and then Lieutenant-General Neil Ritchie (1897-1985). The Allies could now field 736 tanks (with another 500 in reserve) compared to the 390 German panzers plus 150 inferior Italian tanks available to Rommel.
Rommel was finally ready to launch a third attack on Tobruk's defences on 20 November, but thanks to the interception and decoding of German communications, Auchinleck knew this was coming in advance. Consequently, Auchinleck was able to pre-empt Rommel and launch the third Allied offensive to relieve Tobruk, the Crusader Offensive, on 18 November. Rommel was caught by surprise as the Allies moved in on Halfaya and Bardia. The Allies, though, repeated the same errors of earlier encounters and kept their forces too dispersed. Rommel launched a counterattack and destroyed 200 tanks of the British XXX Corps. Fighting around the ridge of Sidi Rezegh (20 mi / 32 km south of Tobruk) was particularly intense. The Eighth Army gained victories elsewhere as the Crusader Offensive mirrored all the Western Desert Campaign in general: both sides winning and losing territory and battles.

Rommel ambitiously attempted to get behind the Eighth Army's lines in order to prevent a retreat into Egypt. This gamble, known as Rommel's 'dash to the wire' (the Egyptian border was marked by a wire fence) did not pay off as Rommel was obliged to divide his forces. The Eighth Army was then bolstered by a breakout by the Tobruk garrison on the night of 21 November – a combined force of infantry, machine-gunners, and tanks – which then linked up with the 2nd New Zealand Division. As with so many desert encounters, the offensive ended in something of a draw with both sides able to fight on another day. However, the material losses were in the favour of the Eighth Army, which having greater reserves, could sustain losses Rommel could not. The Eighth Army suffered nearly 18,000 casualties and lost 287 tanks compared to the Axis powers' 37,400 casualties/lost as prisoners of war. Rommel lost 300 tanks in the offensive. Accordingly, Rommel withdrew from the Tobruk area on 8 December and established his defensive lines at El Agheila by January 1942. Crusader had finally relieved the siege of Tobruk. As Lieutenant-Colonel Belchem noted, "Wavell's decision to hold Tobruk at the time of that retreat was the greatest single factor in enabling him to hold Rommel at the Egyptian frontier" (Holmes, 162).
Aftermath
Rommel was far from giving up on Tobruk. First, he quickly retook nearly half the territory lost in the Crusader offensive. This was thanks to a boost in Axis forces and a corresponding weakness in the Allies, who, with Japan just then entering the war, required troops and material to be diverted to the Far East. Rommel then turned his attention to the Allied defensive line at Gazala, located 64 km (40 mi) west of Tobruk. An attack on the Eighth Army would also pre-empt yet another British offensive, this time to push back Rommel in preparation for large-scale Allied North Africa landings, planned for the following November. Tobruk would eventually fall into enemy hands following Rommel's victory at the Battle of Gazala in June 1942. With the British Eighth Army in total disarray after Gazala and most of Tobruk's defences having been removed for use in the Gazala Line, Rommel captured the port on 21 June when the garrison surrendered. 33,000-35,000 men were taken prisoner of war, and a great deal of supplies and material fell into Rommel's hands. Rommel was made a field marshal for his brilliance. The Eighth Army did finally reverse its fortunes, beginning with the First Battle of El Alamein in July 1942. After a victory at the Second Battle of El Alamein in November, the Allies regained Tobruk. The Allied landings that month then ensured that Rommel's ambitions in the region could never be realised.