The defence by Free French forces of the remote desert watering hole of Bir Hakeim (Hacheim) in Libya, North Africa in May-June 1942 during the Second World War (1939-45) is one of the most heroic episodes in French military history. Although ultimately unsuccessful, the defenders, which included units of the famed French Foreign Legion, held out for 15 days against four German and Italian divisions commanded by no less a figure than General Erwin Rommel (1891-1944).
The Axis forces attacked Bir Hakeim because it was part of the Allied Gazala Line defences, which protected the approach to the vital port of Tobruk. When finally overwhelmed, 2,700 Free French troops from an original garrison of 3,700 still managed to escape Bir Hakeim to fight another day. Meanwhile, Rommel defeated the rest of the Allied forces at the Battle of Gazala and captured Tobruk in June 1942, his greatest victory in North Africa.

The Western Desert Campaigns
In the first years of the second year of WWII, the Allies, then principally British and Commonwealth forces, were especially keen to protect the Suez Canal from falling into enemy hands, that is into the control of the Axis powers Germany and Italy. North Africa was also strategically important if either side wished to control and protect vital Mediterranean shipping routes. The island of Malta was crucial in this role, and holding the island fortress (then in British hands) was another reason to control potential airfields in the North African desert. Finally, North Africa was, at this stage of the conflict, the only place where British and French troops could fight a land war against Germany and Italy. After the embarrassing debacle of the Dunkirk Evacuation and the humiliating Fall of France in 1940, any military victories at all would be a vital morale boost to the Allies.
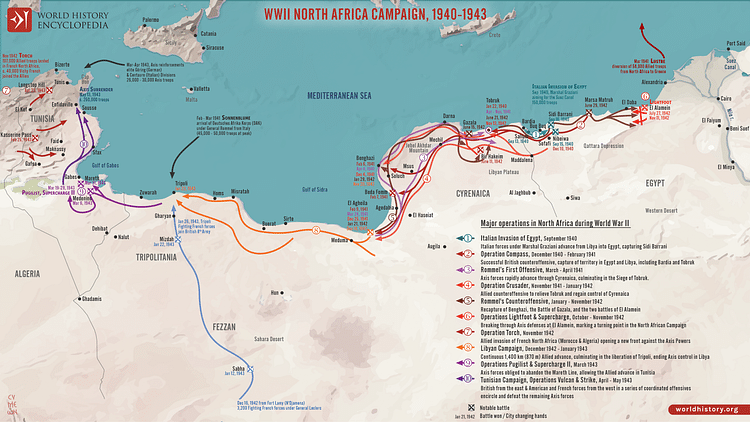
For all of the above reasons, a series of desert battles ensued, which are collectively known as the Western Desert Campaigns (Jun 1940 to Jan 1943). At first, the British Eighth Army faced poorly equipped Italian forces, but these were soon considerably boosted by German troops with superior armour, weapons, and training. From January 1941, the Axis forces in Africa benefitted from the considerable command abilities of General Erwin Rommel, a man who had already gained a reputation as a master of fast armour tactics during the Fall of France in 1940. Rommel first commanded the specialised Deutsche Afrika Korps (DAK) and proved his worth by capturing El Agheila in March 1941 and then Mersa Brega on 1 April. By July, Rommel was in overall practical command of all German and Italian forces in North Africa, although he was still technically under the ultimate authority of the Italian high command. Two victories against Allied offensives in May and June (code-named Brevity and Battleaxe, respectively) were followed by defeat in a third offensive in November, code-named Crusader. Rommel's two persistent problems were insufficient manpower and lack of supplies (especially food, fuel, and ammunition), but by January 1942, this situation improved significantly, and the German general, ignoring his orders to emphasise defence, went on the attack.
The British Eighth Army, which was composed of a range of British, British Empire, and Free French troops, was commanded by Lieutenant-General Neil Ritchie (1897-1985). The overall commander of Allied troops in the Middle East was General Claude Auchinleck (1884-1981). Unfortunately, at this stage of the Western Desert Campaigns, the British Army was poorly equipped, poorly trained, and poorly led. In contrast, "Rommel's force was numerically inferior, but his troops were more professional, better led, and thoroughly steeped in the cooperation of all arms" (Dear, 992).

The Gazala Line
Rommel was determined to acquire the fortress port of Tobruk, a vital logistics hub for the entire region. First, he quickly retook nearly all of the territory lost in the Crusader offensive and then turned his attention to the Allied defensive line at Gazala, located 64 km (40 mi) west of Tobruk whose approach it protected. An attack on the Eighth Army would preempt a British offensive to push back Rommel in preparation for a large-scale Allied landing across North Africa, planned for November 1942. The Gazala Line was a series of static defences composed of isolated strongpoints, each defended by a brigade, with tanks distributed in between and each strongpoint further protected by barbed wire, trenches, and a deep belt of minefields. The line stretched south from Gazala on the coast to the remote outpost of Bir Hakeim, which protected an important desert highway, although in reality, these were no more than Bedouin tracks.
The desert outpost of Bir Hakeim was essentially a badly ruined fort with a couple of concrete shacks. Except for a small hill the French called the 'Observatory', there were next to no prominent topographical features and nothing that might be used by way of defensive fortifications. Bir Hakeim had a natural well or deep cistern but was otherwise not much more than a name on the map. In addition, located at the very end of the Gazala Line, there was nothing around it but open desert, and so the position could be attacked from all sides. A Free French Force was given the task of defending this outpost. As it happened, this was the very end Rommel intended to attack in force, since if Bir Hakeim remained in Allied hands, it would threaten the southern (right) flank of Rommel's main attack on the Eighth Army. Bir Hakeim had to be taken.
The French Defences
The 1st Free French Brigade (1ère Brigade Française Libre) at Bir Hakeim was commanded by Brigadier-General Marie Pierre Koenig (1898-1970). The force included two battalions of the famed French Foreign Legion (13e Demi-Brigade de la Légion Etrangère or DBLE). Koenig had four more infantry battalions, which included French colonial troops from Chad and Congo. There was, too, a single artillery battalion and a company of anti-tank gunners. In all, Koenig had around 3,700 troops under his command.
Koenig had extensive battle experience from the First World War (1914-18), then in Morocco with the French Foreign Legion through the 1930s, and in campaigns in this latest conflict in Norway, France, Dakar, Gabon, and Syria. Consequently, the wily commander knew exactly how to best defend what seemed an entirely indefensible position at Bir Hakeim.
The French Foreign Legion took Caucasian recruits from all over Europe, very often those escaping from the authorities in their own countries. At Bir Hakeim, there were Russian, Georgian, Croatian, and even German legionnaires. There was, too, the peculiarity of the only woman foreign legionnaire, Susan Travers. Travers was English, had served in the Red Cross, and now acted as Koenig's driver; she was also his secret lover. Travers would go on to fight in other arenas during the war and win the prestigious Légion d'honneur award.
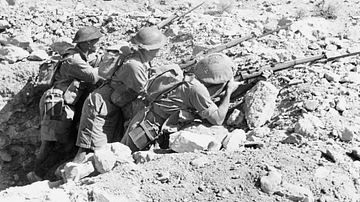
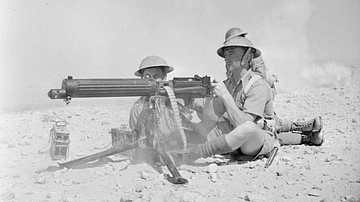
Koenig's force, arriving at the well on 14 February, had three months to prepare their defences, and the time was used well. The Free French force had 26 75-mm guns, which were a little outdated but still effective against tanks, 62 anti-tank guns, and 44 mortars. As the area around the well was quite flat, the French made their own lines of defence consisting of a system of trenches and underground defence posts laid out in concentric circles so that troops could retreat to a successively smaller perimeter in case the enemy broke through the outer line. Dotted around these trenches were deep pits in which an artillery piece was placed. The whole system presented such a low profile and was so well camouflaged that it was extremely difficult to identify where the defenders were grouped, either from ground level or the air. The Free French had plenty of supplies of both ammunition and food, although the latter included standard British rations of tinned corned beef, a rather unfamiliar experience for a legionnaires' palate, no doubt.
The Attack
While Rommel's German tanks were sent around the Gazala Line to try and attack the British from the rear, Bir Hakeim was attacked on 27 May by an Italian force, the 132a Divisione Corazzata 'Ariete'. The Italians first had to deal with the 3rd Indian Motor Brigade which was, unknown to Rommel, stationed south of the target and blocking their line of approach. Both sides were surprised to meet in the desert wasteland, but the Italians easily swept aside the brigade and took 450 prisoners. Arriving at Bir Hakeim, the Italian tanks found themselves severely hampered by the extensive minefields protecting Bir Hakeim. The Italian armour also came under effective fire from the French artillery. Nevertheless, General Giuseppe de Stefanis managed to drive off the enemy's mobile armour – units of the British 4th Armoured Brigade and 7th Motorized – which had been stationed to protect this particular strongpoint of the Gazala Line, and then he attacked the outer defences of the Free French. The Italians lost 32 tanks in their first two attacks and were beaten back, but they were able to surround Bir Hakeim. Instructed by Rommel, the Italian commander sent a delegation group under a white truce flag to offer the French the possibility of immediate surrender. Koenig rejected the offer with the following message: "Gentlemen, thank your generals for their pleasant conduct, but tell them that there is no question of surrender" (Holland, 105). It would not be the last call for a surrender in the following 15 days, but Koenig remained determined to defend this last square of the Gazala Line defences at all costs.

The besieged Free French force then came under an increasing amount of artillery fire and air attacks, but they were occasionally assisted by sorties of the Allied Desert Air Force, which made several attacks on the Italian tanks creeping ever closer to Bir Hakeim. Otherwise abandoned by the British Eighth Army, Koenig was able to send the following grateful signal to Air Vice-Marshall Coningham: "Bravo! Merci pour la RAF" (Ford, 54). Koenig was not entirely defensive-minded as he organised various strong patrols to attack the besiegers' supply lines under the cover of darkness. These raids were so successful and so many prisoners taken that Koenig was obliged to build a fenced area to serve as a prisoner of war camp.
Meanwhile, meeting unexpectedly robust resistance due to the Eighth Army's new and superior Grant tanks, Rommel withdrew his main force to a depression called the Cauldron to regroup and resupply. He was also disappointed to hear that Bir Hakeim had not yet been taken, a task he had imagined would take no more than a day. On 2 June, Rommel ordered a renewed offensive on Bir Hakeim, bolstering the Italian troops with the German 90 Leichte Division and the Italian 'Trieste' Division. To distract the enemy, Rommel sent the 21st Panzer Division to the north. The bulked-up force attacking Bir Hakeim could still not make very much progress against the stern Free French resistance. As a consequence, Rommel sent in a battlegroup of the 15th Panzer Division on 6 June. The Free French force, fighting their own particular corner of the Battle of Gazala, as it became known, now faced an overwhelming assortment of enemy armour, artillery, infantry, and aircraft.
On 7 June, the Axis forces, aided by air strikes, made another collective heave to oust the Free French, but, once again, the defenders held on to their position. The air attacks were usually carried out by Junker Ju 87 'Stuka' dive bombers, which Susan Travers described as like "a plague of silver locusts hovering above us" (Holland, 105). As the attacks intensified, as many as 24 Stuka raids were carried out in one day. Consequently, the trickle of supplies getting through to the Free French dried up completely. Eventually, the defenders were down to rationing: one cup of water per person per day.

On 8 June, Rommel threw in another two German battlegroups. Tanks and infantry attempted to overrun Bir Hakeim while 54 fighter planes and 45 bombers, including Stukas, pounded the underground defences. Still, the Free French held on, although their lines were shrinking with each new attack, and they were steadily losing their heavy artillery pieces one by one. Koenig knew he could not hold the position for much longer and requested his British superiors send a relief force, but none was forthcoming except two woefully inadequate forces from XXX Corps. The Eighth Army was by now in disarray as Rommel was launching multiple attacks from the Cauldron. The only support for the Free French came from the air. On 8 June, the Desert Air Force flew 478 sorties against the four enemy divisions surrounding Bir Hakeim. On 9 June, Rommel ordered another round of artillery shelling on the defensive positions. Axis tanks and infantry attacked in two major waves, each time breaking through the defensive ring, but each time they were eventually pushed out again.
Koenig's men were by now exhausted and ammunition, food, and medical supplies were all running out. Koenig was ordered to withdraw his force on the night of 10 June, but the French commander had already been making his own plans by clearing a 45-metre (50-yard) path through the minefield to the southwest. That day Rommel himself arrived to take personal charge of the attack. Once more, Axis infantry, tanks, and artillery attacked Bir Hakeim, and their air force conducted its heaviest day of bombing. As the fighting became more and more intense and more and more confused, the French slipped away in the darkness through the prepared path in the minefield. Transport was used to take away the wounded, with Travers in the lead driving Koenig in his command jeep, which had been packed with sandbags for extra protection. Two companies remained fighting the enemy in order to cover the retreat. Rommel realised the enemy was withdrawing when a French truck hit a mine, and so he had the general area lit up by parachute flares and then heavily shelled. The Free French raced through the Axis lines in the confusion. More transport, this time provided by the British 7th Motor Brigade, arrived to take away as many of the defenders as possible, as quickly as possible. The now useless position of Bir Hakeim was finally captured on 11 June. 2,700 defenders had managed to escape from the original garrison of 3,600. The Axis forces had suffered 3,000 casualties in the 15-day attack.

Aftermath
The defence of Bir Hakeim had certainly delayed Rommel in his plans, but the Eighth Army did not use this time to any good effect. Indeed, the British Army's position was increasingly precarious. Rommel had captured a central British strongpoint, Knightsbridge, on the night of 12 June. The Eighth Army lost over 140 tanks in 24 hours. The Eighth Army was a total shambles, and the Gazala Line had ceased to be an effective defence. With Rommel gaining further victories against isolated pockets of Allied forces, the way to Tobruk was wide open. The Battle of Gazala ended on 17 June in a massive Allied defeat. Rommel surrounded Tobruk on 17 June and, with significant air support, captured the port on 21 June. 33,000 men were taken prisoner of war. Rommel was promoted to Generalfeldmarschall (field marshall) for this, his greatest victory in Africa. The Eighth Army, having lost 50,000 men but still a formidable force, withdrew behind the defensive line at El Alamein, located further east along the Egyptian coast. The fortunes of war would switch again as the British, reorganised, resupplied, and now led by General Bernard Montgomery (1887-1976), won the crucial Second Battle of El Alamein in October-November 1942, the first of many victories which, by May 1943, secured North Africa for the Allies.
The Battle of Bir Hakeim established the reputation of the Free French as a viable fighting force in the war. It provided a great morale boost for the French, and the battle has gone down in history as a great feat of bravery against overwhelming odds. The battle is today commemorated by the naming of a Paris Metro station after it, the stop that brings millions of annual visitors to the Eiffel Tower. A bridge of the River Seine also bears the name Bir Hakeim while an original artillery piece used in the defence of this forlorn spot in the desert is on permanent display at the Musée de l'Armée in Paris.