The Second Battle of El Alamein (Oct-Nov 1942) was a major battle in North Africa during the Western Desert Campaigns of the Second World War (1939-45). The British Eighth Army led by General Bernard Montgomery (1887-1976) won a decisive victory against Axis forces commanded by General Erwin Rommel (1891-1944), effectively ending German-Italian ambitions in the region.
The Importance of North Africa
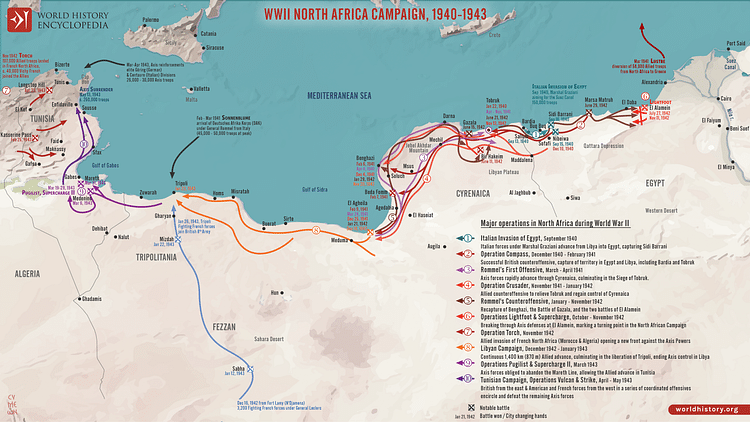
During WWII, North Africa became a major theatre of the conflict as Britain sought to keep control of the Suez Canal and protect vital shipping routes in the Mediterranean. In the early years of the war, this was the only place where Britain could fight a land war against the Axis powers of Germany and Italy and so hopefully gain much-needed victories that would encourage the British people after the debacle of the Dunkirk Evacuation and the horrors of the London Blitz. The fighting in North Africa became known as the Western Desert Campaigns (June 1940 to January 1943).
With Operation Compass (December 1940 to February 1941), British and British Empire troops pushed Italy's poorly equipped army out of Cyrenaica (Eastern Libya). From February, the Axis presence in North Africa was considerably boosted by the arrival of German troops, the elite Deutsche Afrika Korps (DAK) with superior armour, weapons, and training compared to both the Italians and the Allies. Things improved further for the Axis powers when General Rommel took command in North Africa. Rommel won a series of victories in March and April 1941, the Allies survived the siege of Tobruk (April to December 1941), but then Rommel won the Battle of Gazala (May-June 1942) when he smashed through the Allied Gazala Line of defences and finally captured Tobruk in June 1942. Rommel was promoted to the rank of field marshal, and with the British Eighth Army in full retreat, he was determined to take the great prizes of Alexandria and the Suez Canal. He gained another victory at the Battle of Mersa Matruh, but with his army at the very limit of its endurance and supply lines, Rommel was held back at the First Battle of El Alamein (1-27 July 1942). Rommel's army remained a real threat to Egypt and Britain's oil interests in the Middle East. The outcome of these pendulum campaigns, where both sides repeatedly won and lost vast swathes of territory, would finally be decided in one giant, set-piece encounter, the Second Battle of El Alamein.
A Change of Command
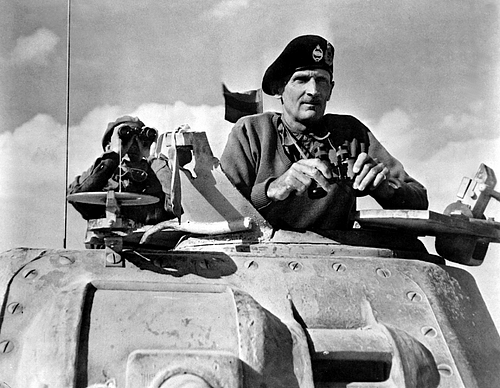
British Prime Minister Winston Churchill (1874-1965) put his army commanders in Africa under constant pressure to deliver a definitive victory against Axis forces. Frustrated at the stalemate of the First Battle of El Alamein, General Claude Auchinleck (1884-1981), Commander-in-Chief Middle East who had taken personal command of the Eighth Army, was replaced by General Harold Alexander (1891-1969) as Commander-in-Chief Middle East. In August 1942, command of the Eighth Army was given to Lieutenant-General Bernard Montgomery.
Montgomery had experience in command in the First World War (1914-18) and more recently in India and the Middle East. 'Monty', as he became known, rang the changes and replaced many commanders with those he could trust absolutely. Critics thought Montgomery rather ponderous and too meticulous in his planning, nor did his cockiness and emphasis on physical fitness endear him to immediate subordinates, but one thing that was not disputed was his popularity with ordinary troops with whom he communicated well. Here, at last, was a general who had supreme confidence in himself and his army.
The Eighth Army, gaining in strength as more resources arrived via Alexandria, won the Battle of Alam Halfa (30 August to 7 September 1942, less commonly called the Second Battle of El Alamein), largely thanks to excellent coordination between air and ground forces and Rommel's limitations in fuel and ammunition. This was Rommel's last large-scale offensive, but neither side gained or lost ground as a result of the battle. Now, everything would hinge on a second confrontation at El Alamein (less commonly called the Third Battle of El Alamein).
The El Alamein Lines
El Alamein was a tiny desert railway halt located 60 miles (95 km) west of Alexandria. Stretching from the coast to 40 miles (65 km) inland, troops positioned in this area of Egypt could not be outflanked by the enemy thanks to the Qattara Depression to the south, a vast area of soft sands and salt marshes that could not be crossed by heavy vehicles. There were several ridges and depressions around El Alamein, which provided excellent natural cover for both tanks and artillery. Unlike his predecessors, Montgomery would not try and hold a defensive line here. Montgomery's army would go on the attack.
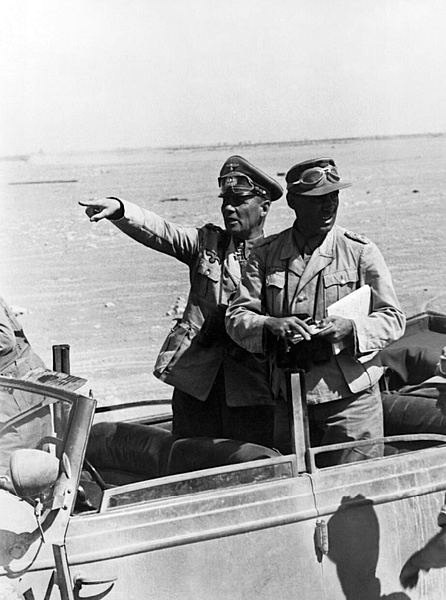
Rommel, known as the 'Desert Fox' for his risky and fast-paced tactics, commanded both German and Italian forces, a combined Axis army, which was renamed in October 1942 the German-Italian Panzer Army. Since the First Battle of El Alamein, Rommel had constructed static defences for his beleaguered army. A lack of fuel seriously restricted Rommel's capacity to use his forces in the highly mobile way he was used to. Rommel had his men lay 500,000 mines to better protect these fixed positions. The minefields, which were 5.5 miles (8 km) deep in some places, were called by the Axis troops the 'Devil's gardens'. Rommel, mindful that his Italian troops had inferior arms and armour, interspersed these with better-equipped German troops, a strategy he called 'corseting'. Rommel kept a number of armoured units as a reserve that could be deployed wherever they were needed if the enemy made sudden gains. Unsure where the enemy might attack, these armoured reserves were by necessity divided into the northern and southern sectors of the defences.
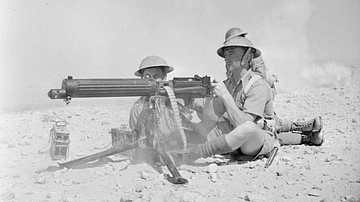
Armies & Weapons
Montgomery, despite pressure from his superiors, refused to be rushed into an offensive before he had amassed an overwhelming superiority in men and arms. It also required time to train troops in the use of new equipment. General J. Strawson sums up Montgomery's approach to this battle: "Montgomery's offensive was to be slow, methodical and final" (163). In these three respects, El Alamein was to be quite different from any previous battle in North Africa. Montgomery also made changes to the structure of the Eighth Army. Previously, troops had been organised into battalions, but now they would operate as divisions, each with their own support groups. In addition, Montgomery created a mobile armoured force that could roam and exploit gaps made in the enemy's lines.

According to The Oxford Companion to World War II (Dear, 254), the relative strengths of each side at El Alamein were:
British Eighth Army
- 195,000 men
- 85 infantry battalions
- 1,029 medium tanks
- 1,451 anti-tank guns
- 908 field and medium artillery guns
- 530 aircraft
Axis Army
- 104,000 men
- 71 infantry battalions
- 496 medium tanks
- 800 anti-tank guns
- 500 field and medium artillery guns
- 500 aircraft
Montgomery's army included divisions and battalions of Australians, Indians, Nepalese, New Zealanders, and South Africans. There were also two Free French brigades and one Greek brigade. The best of the British troops was the battle-hardened 7th Armoured Division, known as the 'Desert Rats' for their badge emblem, a jerboa. Montgomery, a stickler for training, ensured that all troops new to the desert spent some time with experienced campaigners. Montgomery also had units of special forces at his disposal. The Long Range Desert Group (LRDG) and the Special Air Service Brigade (SAS) carried out daring raids behind enemy lines, destroying vital equipment and causing havoc with the enemy's supplies.
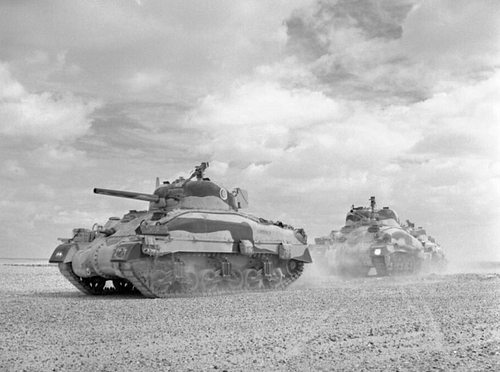
The Allies received important equipment upgrades from the summer of 1942, notably over 300 US-supplied Sherman tanks, as well as superior 6-pdr artillery pieces. The Sherman tank, with 75mm armour and a 75mm main gun was superior to anything the Allies or Axis powers then possessed. Overall, Montgomery's firepower was doubled in the weeks leading up to the battle. The Allied Desert Air Force was also enlarged.

Rommel's most destructive weapon remained the 88mm artillery gun, which was originally designed as an anti-aircraft weapon but used by the DAK as a horizontal anti-tank gun with devastating effect against all enemy armour including the Shermans. None of Rommel's divisions were at full strength, and most importantly of all, he did not have sufficient fuel to manoeuvre his armour as he wished, did not have sufficient ammunition to fight the battle if it lasted for more than 10 days, and did not have reliable air support. Further, static warfare could only advantage the Allies with their superior capacity to replace men and material. For all of these reasons, Rommel later described El Alamein as "a battle without hope" (Strawson, 166).
In another serious blow to the Axis chances, Rommel fell seriously ill and returned to Germany on 23 September. His subordinate General Georg Stumme took over, but when he died of heart failure on the second day of the battle, Rommel flew back to Africa. The absence of the Desert Fox in the first 48 hours may well have been the cause of the Axis forces' hesitant response to Montgomery's sudden blitz.
Phase One: Lightfoot
The Second Battle of El Alamein lasted from 23 October to 4 November 1942. Montgomery called his first offensive Operation Lightfoot (a reference to the masses of mines everywhere), and his plan was to use four infantry divisions to attack the northern Axis lines. As soon as two wide paths were cleared through the minefields using new electronic handheld mine detectors, Montgomery would send in two armoured divisions. The northern part of the Axis lines was the best defended, and so Montgomery hoped to achieve a degree of surprise. To maintain secrecy, a number of deception plans were leaked and diversionary attacks were made to the south. To hide the Eighth Army's amassing of men and equipment in the north, dummy tanks had been assembled three weeks before, which were gradually replaced each night by real ones as the main attack force was built up. In this way, Axis reconnaissance did not detect any unusual movement prior to the actual engagement. To promote the idea that the attack might aim for the southern end of the Axis defences, dummy supply dumps and water installations were set up in the southern part of the Allied lines. In another indicator of Montgomery's meticulous planning, a false landing was organised on the coast behind the Axis lines in the hope that this would draw off some of Rommel's reserves.

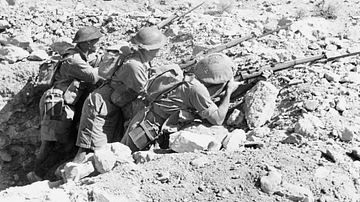
The northern attack was supported by air strikes and a tremendous artillery barrage. This artillery attack, the largest since WWI, blasted the entire Axis lines for 20 minutes, first targeting known enemy artillery positions and then along a wide front. The Allied artillery fired over one million rounds in all. Everything went to plan as the attack was launched on the night of 23 October, the infantry, guided in the darkness by tracer, fired by anti-aircraft guns. The Axis forces were indeed surprised by the enemy appearing in the northern sector, although there was still confusion as to whether this was the real attack or a diversion. Things then began to go awry as Montgomery's advance was seriously delayed by the Axis minefields and the tremendous depth of the defensive lines. However, the inevitable Axis counterattacks, which concentrated on the two rather congested Allied corridors, were contained. The Allied infantry began to make some progress in what Montgomery had called 'crumbling' the enemy, wearing them down and clearing the defensive positions, which would allow both sides' tanks to meet. As expected, there were heavy casualties. Artillery and aircraft kept up a constant series of attacks on the Axis positions and supply lines, notably sinking two German fuel tankers in the harbour of Tobruk on 26 October. In a week of fierce fighting, the battle became one of attrition.
Phase Two: Supercharge
On the morning of 2 November, Montgomery moved into the second phase of his plan, Operation Supercharge. Some divisions were withdrawn from the front line. Rested, repaired and resupplied, two infantry and two armoured divisions were redeployed to attack in two prongs Rommel's lines. The original plan was then changed so that the best German troops in the centre and the heavier defences to the far north were bypassed. The new attack plan concentrated on the area behind Kidney Ridge and those areas where the German and Italian troops were loosely joined. The plan allowed Montgomery to use his armour in an area of the battlefield that was largely free of infantry. This was also an area where the minefields were much less dense, and so the armour would not be so impeded as it had been in the previous attack. In essence, Lightfoot had prepared the ground for Supercharge, what Soviet strategists would recognise as a second echelon, widening and deepening the achievements of a first offensive.
Intensive artillery fire and air attacks lasting several hours preceded Montgomery's final push. Rommel counterattacked as it became clear a new major attack was underway and exactly where this was happening, but time was not on his side. The losses in Axis tanks were now critical. Heavy casualties were inflicted on the Eighth Army, with the Axis anti-tank gunners proving themselves highly effective, particularly against the older Allied Valentine and Crusader tanks. These counterattacks, though, came at a cost of men and material that Rommel could not afford to lose. As the battle dragged on, it became clear to Rommel he could not win it; to remain where he was, would, sooner rather than later, invite the total destruction of his army.
On 3 November, Rommel communicated to Nazi Germany's leader Adolf Hitler (1889-1945) that he could not fight on without more fuel and ammunition. This communication was intercepted by British intelligence. Hitler insisted that Rommel's army stand and fight. By now the Allies had punched a hole clean through the Axis lines, with the 1st and 7th Armoured divisions able to roam at will and attack any point of the Axis rear. Rommel was further pushed back by more Allied advances on 4 November. Hitler now gave Rommel permission to withdraw, but the field marshal had already begun a retreat to Fuka, which was reached on 5 November. A short battle here marked the end of the El Alamein engagement as Rommel retreated westwards. Montgomery had won.
The Eighth Army lost over 330 tanks and suffered around 13,500 casualties in the battle of El Alamein (2,350 killed, 8,950 wounded, and 2,260 missing). On the other side, "British figures, based on intercepts gave German casualties at 1,149 killed, 3,886 wounded and 8,050 captured. Italian losses amounted to 971 dead, 933 wounded and 15,552 captured" (Barr, 404). As Corporal C. W. Mears noted, "There are some lonely graves in the desert, both our own boys and the enemy, just a tin hat and cross denote the fallen" (Barr, 405)
Montgomery ordered a hot pursuit of Rommel but was hampered by the narrowness of Supercharge's breakthrough, a lack of a clear pursuit plan, and bad weather. Heavy rainstorms bogged down vehicles and impeded the capability of the Desert Air Force to attack the retreating enemy column. As the two armies battled westwards through Libya, the Eighth Army captured more Axis prisoners (to a total of 30,000), the majority being Italian infantry who had been obliged to flee El Alamein on foot.

Significance of El Alamein
The Allied success at El Alamein is considered one of the most important victories in the entire war. As General Francis de Guingand (Montgomery's chief of staff) summarises:
It meant the turn of the tide in Britain's fortunes. In fact the victory stood out as a precious jewel after a series of depressing defeats. Then it provided a much-wanted stimulus to British morale, for it convinced our armed forces that, given the right leadership and weapons, they could beat the Germans, and it also inspired confidence amongst the British people in ultimate victory.
(Liddell Hart, 237)
Rommel agreed with this assessment, noting that El Alamein "turned the tide of the war against us and, in fact, probably represented the turning point of the whole vast struggle" (Mitchelhill-Green, 353).

The victory had the added consequence of convincing the Vichy French forces in North Africa to cooperate with the Allies' plans to land three new armies there a few days later in Operation Torch.
Montgomery was promoted to full general and given a knighthood. Meanwhile, Rommel had managed to withdraw to Tunisia to fight another day, but Germany's failures on the Russian Front meant he would never receive significant resources again, and those he did receive were seriously imperilled by Allied bombers. Rommel recommended to Hitler that North Africa be abandoned, but he was ordered to continue the desert campaign as best he could. The Allies were attacked in northern Tunisia and even defeated at the Kasserine Pass in February 1943, but then the Allies won the Battle of Medenine (March 1943). Rommel, by then quite ill, returned to Germany in March 1943; he would never fight again in Africa. Axis forces were driven out of North Africa by May 1943. El Alamein had indeed been the turning point. After the war, Montgomery was made a viscount, and his chosen title was Viscount Montgomery of Alamein.